Hi! My name is Neil, and for as long as I can remember I have absolutely loved anything from Edo Japan. Being born and raised in Edmonton, Alberta there has always been a number of Edo locations for me to go to, whether it was grabbing lunch on days we got out early in high school, or the number of years that I worked in malls in high school and university and practically lived off Edo. Who else is part of the Sukiyaki Beef – 2 Scoops Crew!
Guaranteed that is where my obsession with teriyaki sauce started. So when they reached out and asked if I would be interested in creating and sharing a recipe using their Signature Teriyaki Sauce, it didn’t take long for me to blurt out YES!! even before asking for any details haha. Now that you can buy bottles of the sauce to use at home, it really opens the door to get creative and fall in love with teriyaki all over again. That’s why I decided to go in a completely different direction with my recipe, and make something that Edo does not already serve.
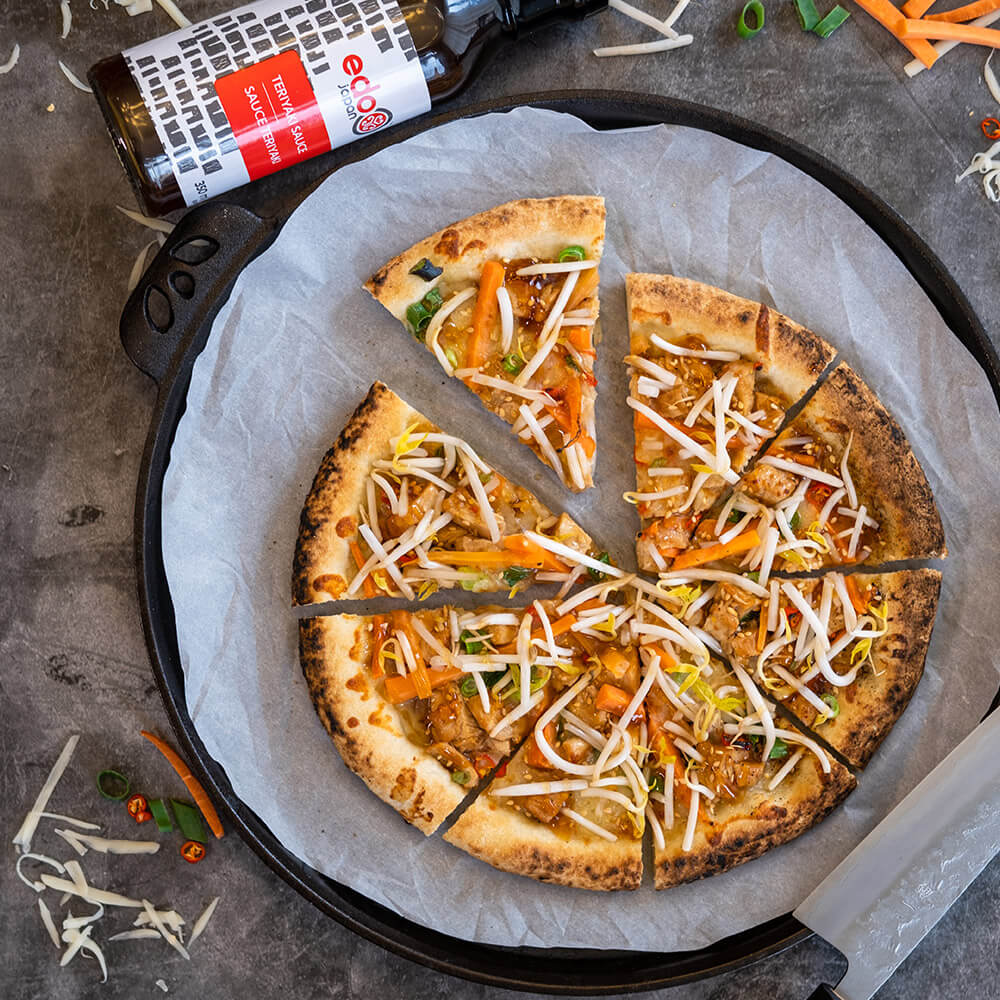
Today I’m sharing with you my recipe for Chicken Teriyaki Pizza! It is a sweet and savoury, slightly spicy pizza that I think you will love. It has a nice airy crust, but you can also sub in dough or a crust bought from a grocery store, juicy chicken that glistens in the teriyaki sauce, a crunch from the carrots, and a cool fresh burst from the bean sprouts. Enjoy!
Prep time: 30 Minutes
Cook time: 45 Minutes
Ingredients
Serving size: 6
Dough
- 450g ‘00’ flour
- 250g warm water
- 12.5g salt
- 0.25g instant yeast (about ⅛ tsp)
Pizza
- 1 bottle of Edo’s Signature Teriyaki Sauce
- 2 chicken breasts
- 1 large carrot
- 4 green onions
- 3 birds eye chilis (optional)
- 1 package of fresh bean sprouts
- 400g high moisture mozzarella cheese
- Toasted sesame seeds
Steps
Dough
- Start the day before you want your pizza
- Combine 450g ‘00’ flour, 250g warm water (approximately 90°F, we don’t want it so hot that it kills the yeast), 12.5g salt, and 0.25g instant yeast (just under 0.5g if active dry) in the bowl of a stand mixer, or a large mixing bowl.
- Attach the dough hook to your mixer and knead for 20 minutes.
- If doing this by hand, mix together in a bowl, and then once formed into 1 mass, knead on a flat work surface for 15 minutes.
- Cover your bowl, and let it rest for 20 minutes.
- Stretch and fold (punch down the dough to release any gas, and then pull 1 side up from the bottom and stretch it to the top center, rotate 90° and repeat until you have rotated 360°)
- Cover your bowl, and let it rest for 20 minutes.
- Form into balls by weighing and dividing your dough, and then pulling it into a ball shape in the palm of your hand. This makes enough for 3 pizzas that are 10-12” in diameter and weigh between 235 and 250g each.
- Cover and proof for 5 hours at room temperature. This can be done in 1 large container, or 3 separate bowls. Pour a very small amount of olive oil in the bottom of the container(s) so that it does not stick.
- After proofing at room temperature for 5 hours, transfer the covered dough to the fridge for at least 1 night, and up to 3 days. This cold fermentation helps with the flavour and airy texture of the dough.
- On the day of baking, remove your dough from the fridge, punch down, and reshape into a ball in a small oiled bowl, and let proof and come up to room temperature. This will take 2-3 hours, and can be sped up by placing it in a turned off oven with the light left on. We want it to double in size, and when lightly pressed with a finger, the indent should spring back. At this point it is ready to be stretched, and baked. Doing this step in a small bowl keeps the dough in a round shape which makes stretching the dough into a circle much easier.
Pizza
- Sprinkle 2 chicken breasts with salt, and place into a lightly oiled, very hot cast iron pan.
- Sear each side for 3-4 minutes, until a golden crust starts to appear. Then transfer to an oven that is preheated to 350°F for 10-15 minutes, or until the chicken registers an internal temperature of 165°F.
- While the chicken is baking, cut the carrot into 2” matchsticks, set aside in a bowl.
- Thinly slice the green onions and the birds eye chilis and set aside in small bowls (if you regularly put chili garlic sauce on your Edo dishes, you will like the heat from these!)
- Rinse the package of bean sprouts in a strainer, and then set aside in a bowl.
- Grate all of the mozzarella cheese, and set aside in a bowl.
- Once the chicken is out of the oven, let it rest for 5 minutes, and then dice (slice into 1cm strips lengthwise, then rotate and make perpendicular cuts to dice).
- Transfer back to your pan, and return to low heat on the stove. Pour ⅓ bottle of Edo’s Signature Teriyaki Sauce over the chicken and mix to incorporate. Remove from heat after 2 minutes.
- Stretch out your pizza dough by placing it on a floured work surface and using your fingers to flatten from inside out, careful not to deflate the crust. Once the dough is about 6” wide, you can carefully pick up and rotate the dough, letting gravity stretch it into its final shape.
- Transfer the dough either onto a floured pizza peel, or a sheet of parchment paper (this will help to transfer to the oven).
- Spread some Edo’s Signature Teriyaki Sauce as your base sauce, then a base layer of mozzarella cheese, then the chicken, then the carrots, green onions and chilis. Top this with a light sprinkle of cheese, and some toasted sesame seeds, and finally a light drizzle of Teriyaki Sauce on top.
- Bake your pizza. I used a pizza oven, but for a standard oven, bake at 500-550°F for about 10 minutes on a pizza stone, baking steel, cast iron pizza pan, or regular baking pan. If your oven has a convection setting this helps to create a nice crust, otherwise you can switch the oven to broil for the last 1-2 minutes of the baking time.
- Remove from oven, slice, and enjoy!